
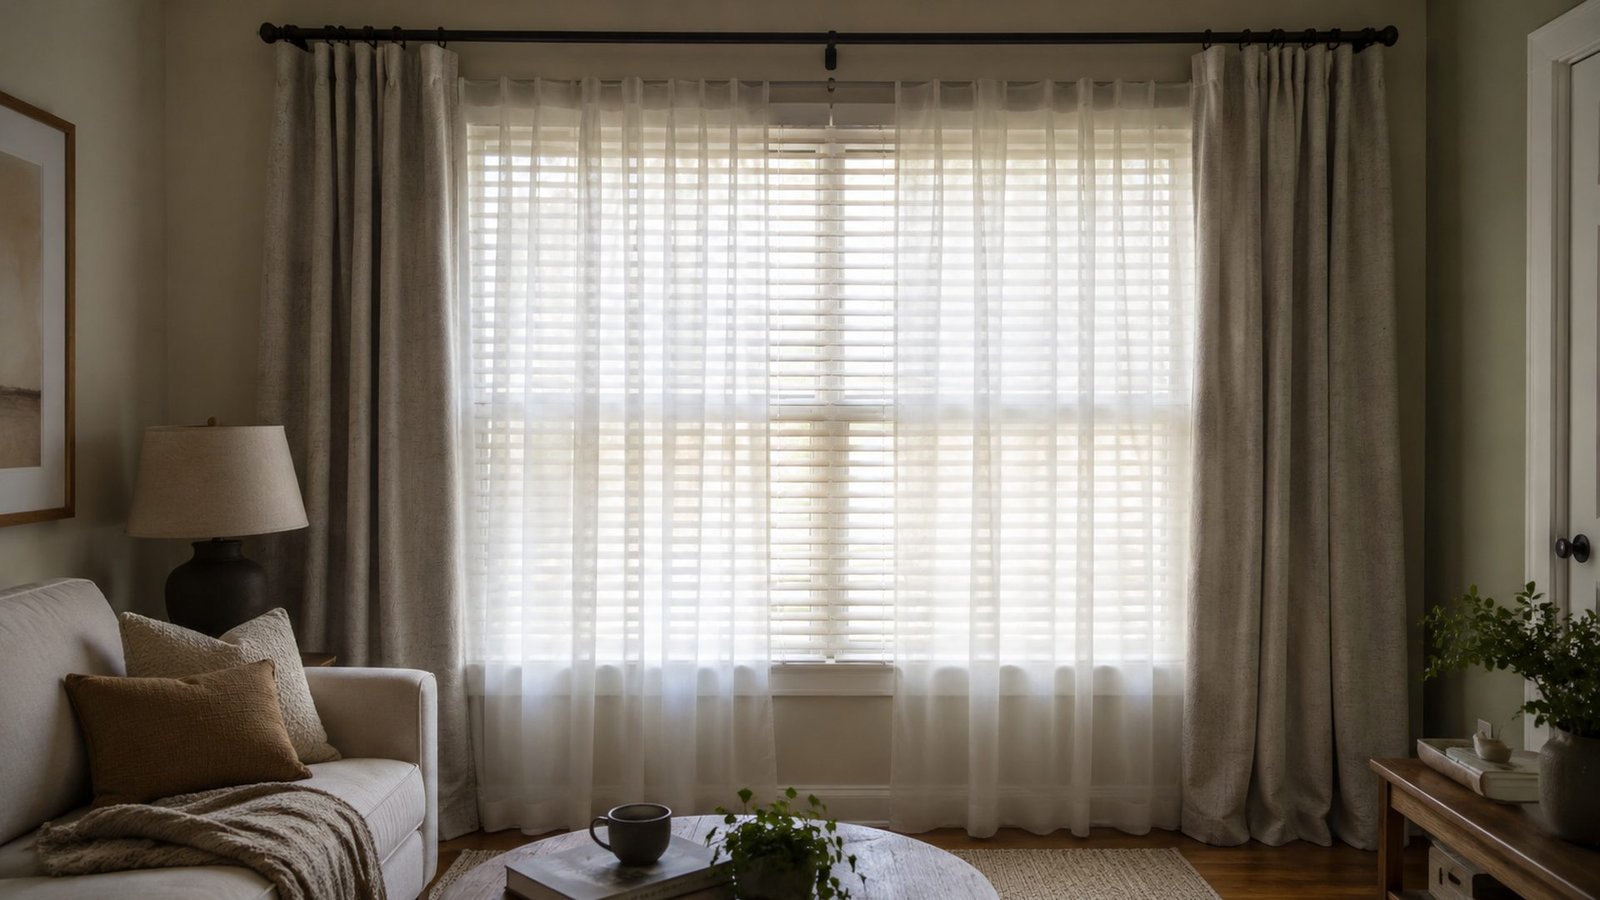
Keep the builder blinds. Hang a sheer on the inner rod (closest to the glass) for daytime privacy and soft light, and a blackout on the outer rod (room side) for night. Prefer a double curtain rod that reuses your existing bracket holes. Leave about 2–4 in (5–10 cm) of stack depth past the blind headrail so closed panels clear the rail instead of snagging it.
Key takeaways
- Keep the builder blinds. Layer over them; do not remove the headrail or the slats for this recipe.
- Order: sheer on the inner rod (glass side); blackout on the outer rod (room side).
- Hardware: a double curtain rod that reuses existing bracket holes. Skip drilling a second header row if the lease only allows current holes.
- Clearance: leave about 2–4 in (5–10 cm) of stack depth past the blind headrail so panels clear when closed.
- Bedroom prioritizes the blackout outer layer at night. Living rooms can run sheer-heavy by day and draw blackout for evening glare.
- Floor length: prefer about a ½ in (1–1.5 cm) float over a puddle on uneven rental floors.
Why keep builder blinds when you add sheer and blackout layers?
Builder blinds are already paid for, already mounted, and usually already approved by the lease. Removing them means patching holes, storing long rails, and arguing about who owns the hardware at move-out. Keeping them gives you a third light lever: tilt the slats for glare, close the sheer for daytime privacy, close the blackout for night. That three-layer stack is the rental advantage most apartment photos skip.
The blinds also protect the glass from direct curtain fabric when windows sweat or when you crack a sash for air. Sheers stay cleaner. Blackout face fabric does not rub the glass every time you walk past. If a lease forbids new holes above the window, the existing blind brackets and any prior curtain holes are your legal map. Work inside that map. For rod height and width measuring that still applies when you hang high and wide, use the live guide to hang curtains high and wide in a rental. This post does not rewrite that measuring recipe; it only adds the layer order and the headrail clearance claim.
Skip medical sleep-disorder claims. This is a curtains and rods guide for light control and privacy, not a health article. AdSense-safe products only: rods, brackets, rings, sheers, blackout panels, felt pads, tension hardware where light loads allow.
How do you layer sheer and blackout curtains over blinds?
Think in rods, not in mood boards. The inner rod sits closest to the glass. The outer rod sits toward the room. Hang the sheer on the inner rod. Hang the blackout on the outer rod. That order lets you leave the sheer closed all day for soft privacy while the blackout stacks clear to the sides. At night you draw the blackout across the sheer. You never have to fight a heavy panel that sits behind a light one.
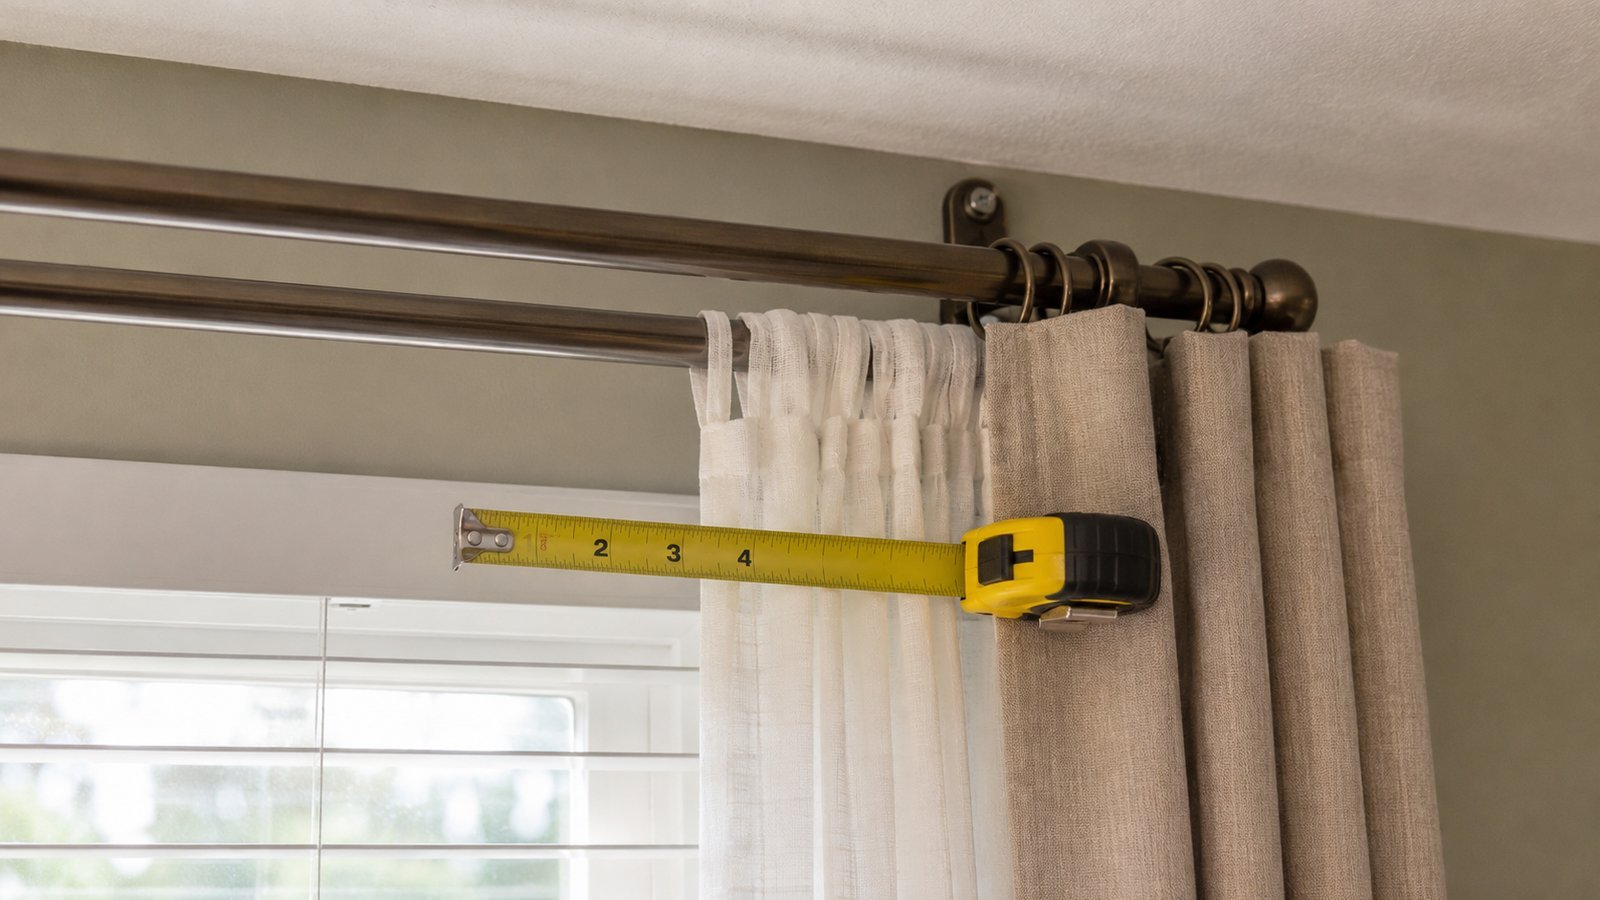
Confirm the stack with a tape before you buy fabric. Measure from the face of the blind headrail out into the room. You want about 2–4 in (5–10 cm) of clear depth so when both panels hang closed, the folds and rings clear the headrail and any tilt wand. Less than about 2 in (5 cm) and the blackout will catch the rail every close. More than about 4 in (10 cm) is fine if your double rod offers it, but most rental brackets land in that 2–4 in band when you reuse the existing holes.
Buy panels wide enough for fullness. A practical rental target is about 1.5–2x the rod width for blackout and closer to 2–2.5x for sheer so the daytime veil looks gathered, not flat. Match finished lengths so both layers kiss the same floor line. Prefer about a ½ in (1–1.5 cm) float above uneven rental floors instead of a puddle that collects dust and trips socks. Hem once; do not chase a fashion puddle on a slanted slab.
Where should sheer curtains sit relative to blackout panels?
Sheer goes behind the blackout from the room view, which means sheer is closer to the glass on the inner rod. Blackout sits in front of the sheer on the outer rod. People still ask this because single-rod photos online reverse the stack for a fashion shot. For daily use, reverse stacks fail: a blackout trapped behind a sheer cannot seal the sides, and a sheer on the outer rod looks thin when you want night privacy.
Daytime living rooms often leave blackout stacked and sheer closed. That keeps the room bright enough to read, soft enough for privacy from the street, and ready for evening TV without a second project. Bedrooms flip the priority: draw the blackout every night; leave the sheer as the daytime soft layer when you open the outer panels. Pair the living room stack with calm lighting elsewhere so you are not fighting one bright lamp against a closed blackout. The rental lighting stack keeps floor and table lamps honest without ceiling rewires.
Dark apartments still need the sheer for daytime glow. Keep the glass clear of hanging clutter so light reaches the room once the blackout is open, the same goal as when you decorate a dark apartment as a renter. Layered curtains are light control, not a substitute for a lamp plan.
What double rod setup reuses existing bracket holes?
Shop a double curtain rod whose brackets share one footprint, or a double bracket that drops into the same screw holes as the old single rod. Measure center-to-center between existing holes before you order. Most rental headers already have two screws per side. A matching double bracket lets you keep that count. Do not drill a second row of holes higher or wider if the lease only allows the current holes. High-and-wide placement still matters for how tall the window reads; measure that geometry with the existing guide to hang curtains high and wide, then choose a double rod that fits those holes.
Weight decides whether a tension or clamp trick is enough. Light sheers alone can ride a tension rod inside the frame or a light clamp-over-blinds kit when the lease is strict and the load is small. Heavy blackout panels need a proper double rod in wall or trim holes that already exist. Rings, grommets, and lined fabric add pounds. If the outer layer feels like a coat, use a real rod. Skip adhesive hooks for blackout weight. Skip ceiling hooks that need new drywall anchors for this recipe.
Photograph the empty header and the hole pattern at move-in. That photo protects the deposit conversation later.
How much clearance past the blind headrail do you need?
Plan on about 2–4 in (5–10 cm) of stack depth past the face of the blind headrail. That is the measured claim this guide centers on. Tape it. Stand at the side of the window and measure from the headrail face out to where the outer rod’s panel will hang. If your current single rod sits too flat against the trim, a double rod with deeper brackets usually buys the missing inches without new holes higher up.
Test with a closed fist held between the headrail and the planned outer fabric line. Roughly a fist is about 3–4 in (8–10 cm). If your knuckles hit the rail when you mime a closed panel, you need deeper brackets or a shallower ring. Plastic rings and skinny clip rings eat less depth than oversized decorative rings. Keep hardware quiet: matte black, brushed nickel, or oil-rubbed bronze that matches existing door levers so the window does not invent a second metal story.
When both layers close, walk the hem. The sheer should not press into the slats. The blackout should not snag the tilt wand. If the wand sticks out more than about 1 in (2.5 cm), shift the wand to the side the panels stack away from, or choose a wandless blind tilt if your blinds allow it without tools that scar the rail. Do not force a second drill line to chase clearance; fix depth at the bracket first.
When is tension or clamp-over-blinds enough?
Tension rods and clamp-over-blinds kits are keep options for light sheers on narrow windows when you cannot add hardware. They fail for heavy blackout. A spring tension rod that holds a voile will not hold a lined blackout through a humid summer. Clamp systems that bite the blind rail can mark soft vinyl rails and void the “leave it as found” expectation. Use them only when the sheer is the only extra layer and the blackout is elsewhere, or when the blackout is a light room-darkening panel under about the weight of a throw blanket per side.
Proper double rod in existing holes is required when: the blackout is true blackout or heavily lined; the window is wider than about 60 in (152 cm); kids or pets will tug panels; or the lease already shows prior curtain holes you can reuse. That is the default keep path for this guide. Tension is the exception for sheer-only add-ons, not the main recipe.
Living rooms that already feel small should keep the stack visually quiet. One double rod, two fabrics, no extra valance. The same restraint helps when you make a small room look bigger as a renter: fewer lines, longer verticals, one clear path past the sofa.
How should bedrooms and living rooms use the same stack?
Same hardware. Different draw habits. In the bedroom, treat the blackout outer layer as the nightly close. Open it in the morning; leave the sheer for daytime privacy while you dress. Keep nightstand clutter low so the hem stays clear; a measured top on a tiny nightstand beats a pile that snags the panel. Skip claims about curing insomnia. Darkness helps many people sleep; your lease and your fabric choice are the only promises this post makes.
In the living room, run sheer-heavy by day. Stack blackout for soft daylight and street privacy. Draw blackout for movie glare or west-sun evenings. Pair with a calm sofa tone so the outer panels do not fight the seating; a warm-grey rental sofa corner reads finished next to cream or soft charcoal curtains. If a shallow console sits under or beside the window wall, keep depth honest so curtains can stack; see the 12 in console behind a sofa guide when the pass-behind is tight.
Studios can use one stack language in both zones. Hang high and wide once, then let furniture zoning do the rest, as when you zone a studio without a divider. Do not hang a second conflicting rod over the bed nook if one shared window serves both sleep and sofa.
What should you keep, and what should you skip?
| Keep | Skip |
|---|---|
| Builder blinds in place | Removing blinds and patching a full header for fashion alone |
| Sheer on the inner rod (closest to glass) | Sheer on the outer rod with blackout trapped behind |
| Blackout on the outer rod (room side) | Single-rod “both fabrics on one pole” that cannot operate independently |
| Double rod reusing existing bracket holes | Drilling a second header row when the lease only allows current holes |
| About 2–4 in (5–10 cm) clearance past the headrail | Flat brackets that let panels snag the rail every close |
| About ½ in (1–1.5 cm) float at the floor | Deep puddles on uneven rental slabs |
| Tension or clamp only for light sheers when needed | Tension rods for heavy blackout; adhesive hooks for lined panels |
| Bedroom: blackout drawn at night; living: sheer-heavy by day | Medical sleep claims; ceiling rewires for drapery motors |
Photograph rails, holes, and paint before and after. There is no honest zero-scuff promise on every rental finish, but reusing holes and keeping blinds cuts the risk list.
What does a weekend layering plan look like?
Saturday morning: leave the blinds up. Photograph the header. Measure hole spacing, rod width target, and headrail-to-room depth with a tape. Write inches and centimeters. Confirm whether existing holes can take a double bracket. Read the high-and-wide measuring notes on hang curtains high and wide so height and width stay consistent with the rest of the apartment.
Saturday midday: install the double rod in the existing holes. Hang sheer on the inner rod, blackout on the outer. Check the 2–4 in (5–10 cm) clearance with the tape in frame. Close both layers. Open both. Tilt the blinds behind the sheer. If anything snags, fix bracket depth or ring size before you hem.
Saturday evening: live-test. Draw blackout for glare. Open blackout and leave sheer for privacy with lamps on. Walk the hem for the ½ in (1–1.5 cm) float. Sunday daylight: photograph from the sofa and from the side so the stack depth reads. If you see removed blinds, a second drilled row, or panels kissing the headrail, restore the recipe: keep blinds, sheer inner, blackout outer, 2–4 in clearance, existing holes only.
Keep the rest of the room from fighting the window. Furniture paths stay clear the way you arrange furniture in a small living room. TV glare evenings may still need the blackout even if wires stay hidden per the hide TV wires rental guide. A quiet rug field under the seating helps the eye stop once, as in rug size for a small living room.
FAQ
Do people still use sheer curtains with blackout curtains?
Yes. The pair is still the practical rental stack: sheer for daytime privacy and soft light, blackout for night and glare. Keep your builder blinds underneath so you have three levers instead of one. Hang sheer on the inner rod and blackout on the outer rod, and leave about 2–4 in (5–10 cm) past the headrail so the panels clear.
How to layer sheer and blackout curtains together?
Use a double curtain rod that reuses existing bracket holes. Put the sheer on the inner rod closest to the glass and the blackout on the outer rod toward the room. Aim for about 1.5–2x fullness on blackout and about 2–2.5x on sheer. Match lengths with about a ½ in (1–1.5 cm) float at the floor. Keep the blinds. Tape the 2–4 in (5–10 cm) clearance before you call the job done.
Do sheer curtains go in front or behind blackout curtains?
From the room, blackout is in front and sheer is behind. That means sheer sits on the inner rod by the glass and blackout sits on the outer rod. The sheer can stay closed by day while blackout stacks aside. At night the blackout draws across the sheer. Reversing that order blocks independent use and usually snags the blind headrail.
How much clearance past the blind headrail do layered rental curtains need?
Leave about 2–4 in (5–10 cm) of stack depth past the face of the blind headrail. That clearance lets closed sheers and blackout panels clear the rail and the tilt wand. Measure with a tape from the headrail face out to the outer fabric line. Fix short depth with deeper double brackets in the same holes before you drill anything new.
Should renters remove builder blinds before hanging sheer and blackout layers?
No. Keep the builder blinds. Layer sheer and blackout over them with a double rod in existing holes. Removing blinds adds patching, storage, and deposit risk for little gain when the three-layer stack already covers daytime privacy, soft light, and night darkening.
Related: hang curtains high and wide · rental lighting stack · decorate a dark apartment · style a tiny nightstand · make a small room look bigger · warm-grey rental sofa · 12 in console behind a sofa · zone a studio without a divider · arrange furniture in a small living room · hide TV wires · rug size for a small living room · low-light plants in a rental · small balcony rental kit · hang art without nails